Safeguard IP and device authenticity#
xCORE devices contain on-chip one-time programmable (OTP) memory that can be blown during or after device manufacture testing. You can program the xCORE AES Module into the OTP of a device, allowing programs to be stored encrypted on flash memory. This helps provide:
Secrecy
Encrypted programs are hard to reverse engineer.
Program Authenticity
The AES loader will not load programs that have been tampered with or other third-party programs.
Device Authenticity
Programs encrypted with your secret keys cannot be cloned using xCORE devices provided by third parties.
Once the AES Module is programmed, the OTP security bits are blown, transforming each tile into a “secure island” in which all computation, memory access, I/O and communication are under exclusive control of the code running on the tile. When set, these bits:
force boot from OTP to prevent bypassing,
disable JTAG access to the tile to prevent the keys being read, and
stop further writes to OTP to prevent updates.
Danger
The AES module provides a strong level of protection from casual hackers. It is important to realize, however, that there is no such thing as unbreakable security and there is nothing you can do to completely prevent a determined and resourceful attacker from extracting your keys.
The xCORE AES module#
The xCORE AES Module authenticates and decrypts programs from SPI flash devices. When programmed into a device, it enables the following secure boot procedure, as illustrated in Secure boot procedure used with the AES Module.
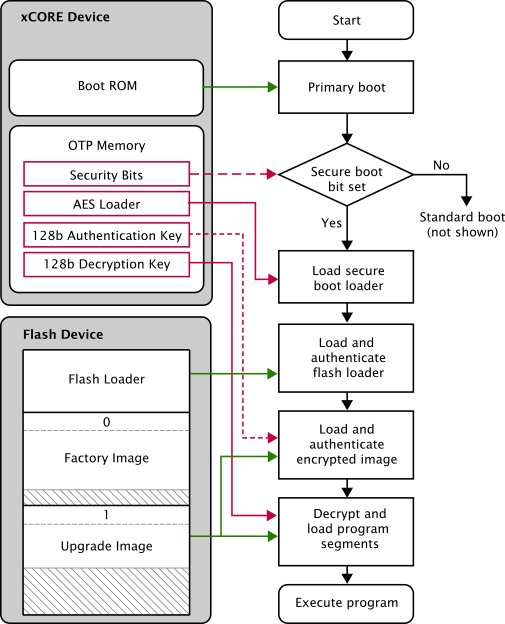
Secure boot procedure used with the AES Module#
The device loads the primary bootloader from its ROM, which detects that the secure boot bit is set in the OTP and then loads and executes the AES Module from OTP.
The AES Module loads the flash loader into RAM over SPI.
The AES Module authenticates the flash loader using the CMAC-AES-128 algorithm and the 128-bit authentication key. If authentication fails, boot is halted.
The AES Module places the authentication key and decryption key in registers and jumps to the flash loader.
The flash loader performs the following operations:
Selects the image with the highest number that validates against its CRC.
Authenticates the selected image header using its CMAC tag and authentication key. If the authentication fails, boot is halted.
Authenticates, decrypts and loads the table of program/data segments into memory. If any images fail authentication, the boot halts.
Starts executing the program.
For multi-node systems, the AES Module is written to the OTP of one tile, and a secure boot-from-xCONNECT Link protocol is programmed into all other tiles.
Develop with the AES module enabled#
You can activate the AES Module at any time during development or device manufacture. In a development environment, you can activate the module but leave the security bits unset, enabling:
XFLASH to use the device to load programs onto flash memory,
XGDB to debug programs running on the device, and
XBURN to later write additional OTP bits to protect the device.
In a production environment, you must protect the device to prevent the keys from being read out of OTP by the end user.
To program the AES Module into the xCORE device on your development board, start the tools and enter the following commands:
xburn --genkey *keyfile*
XBURN writes two random 128-bit keys to keyfile. The first line is the authentication key, the second line the decryption key.
The keys are generated using the open-source library crypto++. If you prefer, you can create this file and provide your own keys.
xburn -l
XBURN prints an enumerated list of all JTAG adapters connected to your PC and the devices on each JTAG chain, in the form:
ID - NAME (ADAPTER-SERIAL-NUMBER)xburn --id *ID* --lock *keyfile* --target-file *target*.xn --enable-jtag --disable-master-lock
XBURN writes the AES Module and security keys to the OTP memory of the target device and sets its secure boot bit. The SPI ports used for booting are taken from the XN file.
To encrypt your program and write it to flash memory, enter the command:
xflash --id *ID* *bin*.xe --key *keyfile*
To protect the xCORE device, preventing any further development, enter the command:
xburn --id *ID* --target-file *target*.xn --disable-jtag --enable-master-lock
Production flash programming flow#
In production manufacturing environments, the same program is typically programmed into multiple SPI devices.
To generate an encrypted image in the xCORE flash format, start the tools and enter the following command:
xflash *prog*.xe -key *keyfile* -o *image-file*
This image can be programmed directly into flash memory using a third-party flash programmer, or it can be programmed using XFLASH (via an xCORE device). To program using XFLASH, enter the following commands:
xflash -l
XFLASH prints an enumerated list of all JTAG adapters connected to your PC and the devices on each JTAG chain, in the form:
ID - NAME (ADAPTER-SERIAL-NUMBER)xflash --id *ID* --target-file *platform*.xn --write-all *image-file*
XFLASH generates an image in the xCORE flash format that contains a first stage loader and factory image comprising the binary and data segments from your compiled program. It then writes this image to flash memory using the xCORE device.
The XN file must define an SPI flash device and specify the four ports of the xCORE device to which it is connected.
Production OTP programming flow#
In production manufacturing environments, the same keys are typically programmed into multiple xCORE devices.
To generate an image that contains the AES Module and security keys to be written to the OTP, start the tools and enter the following commands:
xburn --genkey *keyfile*
XBURN writes two random 128-bit keys to keyfile. The first line is the authentication key, the second line the decryption key.
The keys are generated using the open-source library crypto++. If you prefer, you can create this file and provide your own keys.
xburn --target-file *target*.xn --lock *keyfile* -o *aes-image*.otp
XBURN generates an image that contains the AES Module, security keys and the values for the security bits.
Danger
The image contains the keys and must be kept secret.
To write the AES Module and security bits to a device in a production environment, enter the following commands:
xburn -l
XBURN prints an enumerated list of all JTAG adapters connected to the host and the devices on each JTAG chain, in the form:
ID - NAME (ADAPTER-SERIAL-NUMBER)xburn --id *ID* --target-file *target*.xn *aes-image*.otp
XBURN loads a program onto the device that writes the AES Module and security keys to the OTP, and sets its secure boot bits. XBURN returns 0 for success or non-zero for failure.
Security implications of application design#
The use of various software and hardware features by the program and their security implications must be carefully considered:
Data partition
The data partition is not encrypted or signed, so must be considered untrusted by a secure application. A strong security scheme can be implemented for the data partition but this lives within the domain of the application, and is not provided by XFLASH.
Use of software memory is supported for secure applications, but no signing or encryption of the data in “.SwMem” sections is performed. The application should consider the data placed in those sections and subsequently read from flash at runtime to be untrusted.
Secure schemes can be implemented within the application in a similar manner to the data partition but this may come at the cost of software memory performance.
Data placed in “.ExtMem” sections is loaded from flash by the secure bootloader and is encrypted and signed using the secret keys provided to XFLASH.
This provides a basic level of security for the data placed in LPDDR memory, though it is important to note that LPDDR is external off-chip memory that can be sniffed and tampered with during the run time of your application using a hardware attack.
Use of LPDDR by a secure application should therefore be carefully implemented, following secure programming practices.
If the above features are required for your application and a strong level of security is desired, it is important to ensure the application does not trust any data residing in any external memory.
Practically, this will consist of:
Verifying authenticity of external data using modern cryptography standards
The data must be authenticated each time it is read to prevent attacks where the external data is changed following an initial authentication.
For large amounts of data, consider structures such as a hash tree to enable performant, authenticated accesses.
Encryption should be additionally considered if the external data must be kept secret.
It is safe to embed key material in your application code for these purposes as it will be protected by the xCORE AES module, though it is strongly recommended that you do not reuse the secure boot keys provided to XBURN and XFLASH within your application and instead use different keys. This will prevent leaking the secure boot keys in the event that the application is compromised.
Defensive programming of the application
Authentication is the first line of defence - the second is to design the application such that it cannot be compromised if external data was to be modified by an attacker.
This consists of thoroughly verifying your code to ensure it behaves predictably and safely upon receipt of unexpected external data.
Unpredictable behaviour may manifest as buffer overflows or similar bugs that can be exploited by an attacker to gain control over the device and reveal IP.